If you’re staying in Ximending and planning to visit Longshan Temple, getting there is quick, affordable, and incredibly easy.
I’ve visited Taiwan five times and have been to Longshan Temple three times. Every visit reminds me why I love Taipei—its MRT system is efficient, tourist-friendly, and makes exploring the city stress-free.
Whether it’s your first time in Taipei or you’re returning for another trip, here’s exactly how to get from Ximending to Longshan Temple.
Planning your Taipei itinerary? Check out my UltimateTaiwan Travel Guidefor more tips on transportation, hotels, and must-visit attractions.
Best Time to Visit: Early morning or late afternoon
Payment Option: EasyCard accepted on all Taipei MRT lines
Table of contents
How to Get to Longshan Temple from Ximending
Option 1: By MRT (Recommended)
Head to Ximen Station.
Take the Bannan Line (Blue Line) toward Dingpu.
Ride for one stop and get off at Longshan Temple Station.
Exit via Exit 1.
Turn right and walk for 1–2 minutes.
You’ll arrive at Longshan Temple.
It’s one of the easiest day trips you can do in Taipei, especially if you’re staying in Ximending.
Alternative Ways to Get There
Walk from Ximending
If you enjoy exploring on foot, you can walk from Ximending to Longshan Temple in approximately 20–25 minutes.
The route takes you through Wanhua District, one of Taipei’s oldest neighborhoods, where you’ll pass local shops, traditional markets, and hidden food spots.
Taxi or Uber
A taxi ride from Ximending to Longshan Temple takes around 5–10 minutes, depending on traffic.
Estimated fare: NT$100–150.
This option is convenient if you’re traveling with luggage, children, or older family members.
Public Bus
Several Taipei city buses serve the Wanhua area. However, for first-time visitors, the MRT remains the easiest and fastest option.
My Experience Visiting Longshan Temple
I’ve been to Taiwan five times and have visited Longshan Temple three times.
What I love most is how accessible it is from Ximending. Even if you only have a few hours in Taipei, you can easily fit it into your itinerary.
I usually visit early in the morning when it’s less crowded and the atmosphere feels especially peaceful. Watching locals pray and seeing the beautiful traditional architecture offers a meaningful glimpse into Taiwanese culture.
Since admission is completely free, it’s one of the best budget-friendly experiences in Taipei.
Travel Tips
Bring an EasyCard for convenient MRT travel.
Wear comfortable shoes if you plan to explore the surrounding Wanhua area.
Visit early in the morning to avoid crowds.
Be respectful when taking photos inside the temple grounds.
Consider pairing your visit with nearby attractions like Bopiliao Historical Block and Huaxi Street Night Market.
Final Thoughts
Longshan Temple is one of the easiest attractions to visit from Ximending. With just one MRT stop between them, you can reach this iconic Taipei landmark in minutes.
If you’re building your Taipei itinerary, this quick and free cultural experience deserves a spot on your list.
Hi, I’m Helena! 👋
I’m the creator of Mommy Helena, a travel blog where I share detailed itineraries, hotel reviews, food discoveries, and travel tips based on my personal experiences across Asia.
As a solo traveler from the Philippines, I love exploring destinations like Hong Kong, Taiwan, Vietnam, Thailand, Singapore, and beyond. My goal is to help fellow travelers plan smarter, save time, and make the most of every trip.
✈️ Follow my adventures and discover practical travel guides, budget tips, and honest recommendations from my journeys.
Affiliate Disclosure:
Some links in this description are affiliate links. This means I may earn a small commission if you make a purchase through them, at no additional cost to you. Thank you for supporting my travel content and helping me continue sharing hotel reviews, travel guides, and solo travel adventures.
Singapore is one of those destinations I never get tired of visiting.
I’ve been to Singapore 11 times already—some trips with my family and three as a solo traveler—and every visit feels different. Even after more than a decade of returning, I still discover new attractions, cafes, and hidden corners of the city.
Some of my favorite areas include Sentosa for attractions, Marina Bay for iconic views, and Haji Lane for colorful photo spots. When it comes to shopping for pasalubong, I always find myself returning to Bugis and Chinatown.
One thing I love most about Singapore is how easy it is to explore. The transportation system is efficient, attractions are easy to reach, and traveling solo feels safe and convenient.
If you’re planning your first Singapore trip, these are the 12 places I personally recommend.
Why I Keep Coming Back to Singapore
I’ve visited Singapore 11 times, including 3 solo trips and multiple family vacations. The recommendations in this guide are based on places I’ve personally visited and hotels I’ve personally stayed at.
My Top 12 Places To Visit In Singapore
1. Jewel Changi Rain Vortex
Why Visit:
The world’s tallest indoor waterfall is usually my first or last stop in Singapore. It’s free to visit and makes a great introduction to the city.
tip: Visit in the evening for the light show.
2. Old Hill Street Police Station
Why Visit: One of the most colorful buildings in Singapore and a favorite photography spot.
Tip: Stand across the street to capture the entire facade.
3. CHIJMES
Why Visit:
A beautiful heritage complex filled with restaurants, cafes, and stunning architecture.
tip: Visit during golden hour.
4. Haji Lane
Why visit?
One of my favorite areas in Singapore for Instagram-worthy photos. The colorful murals, cafes, and boutique shops make every visit enjoyable.
tip: Visit early in the morning before the crowds arrive.
5. Chinatown
Why visit?
Chinatown is one of my favorite places to visit in Singapore for its vibrant mix of culture, food, shopping, and history. It’s also where I usually shop for pasalubong because there are plenty of souvenir stores and affordable finds.
Tips:
Visit in the late afternoon so you can explore during the day and experience the lively atmosphere at night.
Wear comfortable shoes because the best way to explore Chinatown is on foot.
6. Singapore River Cruise
Why visit?
One of the best ways to see Singapore’s skyline and historic landmarks from a different perspective.
tip: Book a sunset cruise.
7. Singapore Flyer
Why visit?
A relaxing way to enjoy panoramic views of the city.
One reason I keep returning to Singapore is how easy it is to get around.
From Changi Airport, it is simple to reach hotels and attractions using public transportation.
During my earlier trips, I used an EZ-Link card. These days, I usually use my GCash Visa card or GoTyme card for tap-and-go payments on buses and MRT trains.
I also use my GoTyme card to withdraw Singapore dollars from UOB ATMs at Changi Airport whenever I need cash.
After 11 visits, Singapore remains one of my favorite destinations in Asia.
Whether you’re visiting for the first time or returning for another adventure, there’s always something new to discover—from iconic attractions and hidden photo spots to delicious food and unique neighborhoods.
And if you’re like me, one trip to Singapore is rarely enough.
“Some places are worth visiting once. Singapore is the kind of place that keeps calling you back.”
One of the biggest misconceptions about Singapore is that it’s extremely expensive. While some attractions and hotels can be pricey, I find that Singapore can still fit different budgets depending on your travel style.
Paid attractions such as Gardens by the Bay, Singapore Flyer, or Marina Bay Sands SkyPark
Family Traveler
Estimated Daily Budget: SGD 350+ (₱15,000+)
Includes:
Family-friendly hotel
Attractions such as Universal Studios Singapore and Singapore Oceanarium
Restaurant dining
Shopping and souvenirs
Typical Costs
🏨 Hotels
Budget: SGD 80–150 per night
Mid-range: SGD 150–300 per night
Premium: SGD 300+ per night
🚇 Transportation
MRT/Bus rides: SGD 1–3 per trip
Airport to city via MRT: SGD 2–4
Taxi/Grab: SGD 15–40+
🍜 Food
Hawker Center Meal: SGD 5–10
Fast Food Meal: SGD 8–15
Casual Restaurant: SGD 15–30
Specialty Coffee: SGD 6–10
Bubble Tea: SGD 4–8
🎟️ Popular Attractions
Universal Studios Singapore
Singapore Oceanarium
Marina Bay Sands SkyPark
Singapore Flyer
Gardens by the Bay
Prices vary throughout the year, so I always check the latest rates before my trip.
My Personal Budget
When I travel solo to Singapore, I usually budget around SGD 100–150 per day excluding flights and hotel. This comfortably covers MRT transportation, food, coffee stops, attractions, and a little shopping for pasalubong.
💡 Mommy Helena Tip
Because Singapore’s MRT system is so efficient, I save a lot on transportation by staying near MRT stations like Lavender, Bencoolen, or Chinatown. It may cost a little more for the hotel, but I usually spend less on Grab rides and save a lot of time getting around.
Hi, I’m Helena! 👋
I’m the creator of Mommy Helena, a travel blog where I share detailed itineraries, hotel reviews, food discoveries, and travel tips based on my personal experiences across Asia.
As a solo traveler from the Philippines, I love exploring destinations like Hong Kong, Taiwan, Vietnam, Thailand, Singapore, and beyond. My goal is to help fellow travelers plan smarter, save time, and make the most of every trip.
✈️ Follow my adventures and discover practical travel guides, budget tips, and honest recommendations from my journeys.
Affiliate Disclosure
Some of the links below are affiliate links. This means I may earn a small commission at no extra cost to you if you make a purchase through my links.
Thank you for supporting my content and helping me continue sharing travel guides, itineraries, and honest travel experiences.
Looking for a relaxing Hong Kong itinerary for first-time visitors?
On my second day in Hong Kong, I traded the usual rush of sightseeing for a slower day filled with harbor views, good coffee, Kennedy Town, a sunset cruise, and the famous Symphony of Lights.
If you’re traveling solo or visiting Hong Kong for the first time, this itinerary is easy to follow and doesn’t feel overwhelming.
🇭🇰 HONG KONG DAY 2 AT A GLANCE
✔ Avenue of Stars ✔ Clock Tower ✔ Victoria Harbour Promenade
☕ Starbucks with a Harbour View
🚤 Water Taxi to Central
🎡 Hong Kong Observation Wheel
📍 Kennedy Town Basketball Court
☕ % Arabica Kennedy Town
🚢 Victoria Harbour Sunset Cruise
☕ Luckin Coffee
✨ Symphony of Lights
This Hong Kong Day 2 itinerary is perfect for first-time visitors and solo travelers looking for a mix of sightseeing, coffee stops, harbor views, and a memorable sunset cruise.
Where I Stayed in Hong Kong
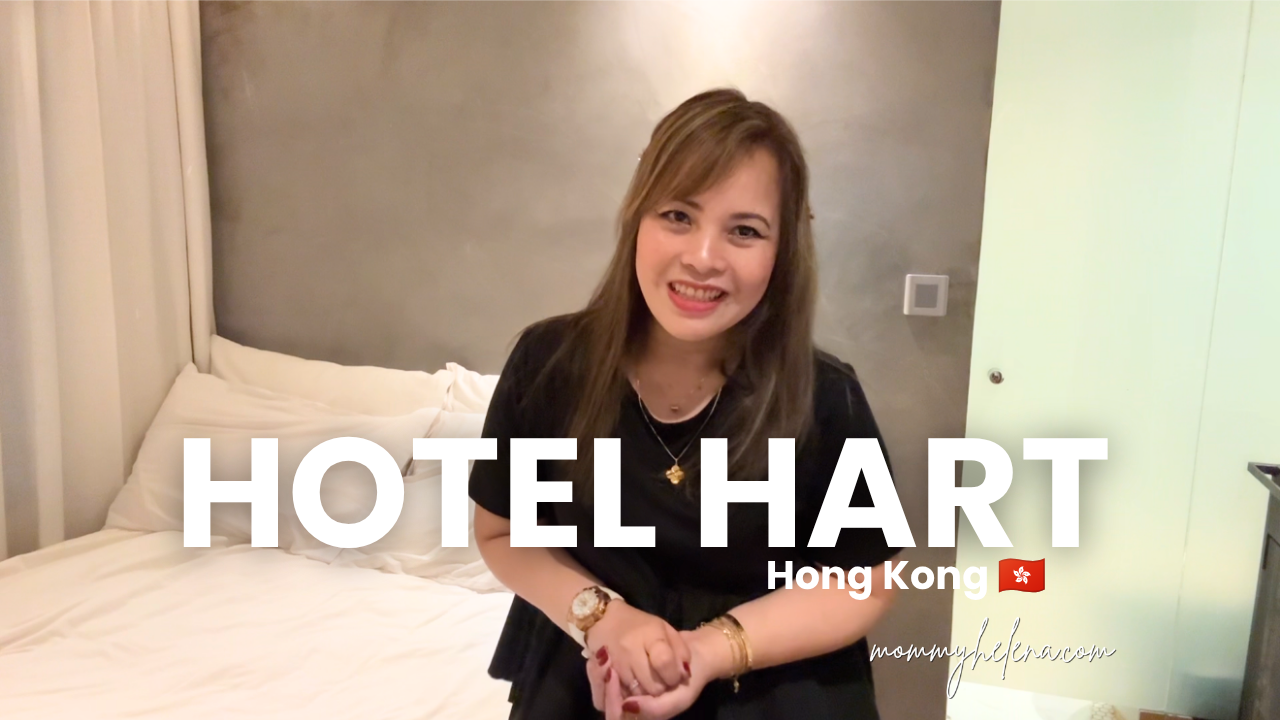
For this trip, I stayed at Hotel Hart in Tsim Sha Tsui.
One of the reasons I like this hotel is its location. It’s only a short walk from Victoria Harbour, Avenue of Stars, restaurants, convenience stores, and nearby MTR stations. If you’re visiting Hong Kong for the first time and want to stay in a central area without spending too much on accommodation, Tsim Sha Tsui is one of the best places to base yourself.
You can book Hotel Hart through Agoda, Klook, or Trip.com.
I woke up to grey skies and rain. Instead of forcing myself to follow my original itinerary, I decided to take things slow and wait for the weather to improve.
One thing I’ve learned after visiting Hong Kong several times is that not every travel day needs to be packed with activities.
Sometimes the best thing you can do is enjoy the city at a slower pace. Since my hotel was only a few minutes away from the waterfront, I spent the morning walking around Victoria Harbour.
I visited the Avenue of Stars, Clock Tower, Viewing Deck, and Victoria Harbour Promenade while enjoying the cooler weather.
Even after multiple visits to Hong Kong, the skyline never gets old. There’s just something special about seeing Hong Kong Island across the harbor.
Breakfast with a View
No travel day starts without coffee. I grabbed breakfast from Starbucks near the waterfront and enjoyed my coffee while overlooking Victoria Harbour.
Simple moments like these are often my favorite part of traveling solo. No schedules. No rush. Just coffee and a beautiful view.
Taking the Water Taxi to Central
Once the rain stopped, it was time to continue exploring. Instead of taking the MTR, I decided to try the Hong Kong Water Taxi.
While the MTR is definitely faster, the Water Taxi offers a completely different experience.
The ride gives you a scenic perspective of Victoria Harbour and Hong Kong’s impressive skyline. If you’re not in a hurry, I highly recommend trying it at least once during your trip.
You can book Water Taxi tickets through Klook, Agoda, or GetYourGuide before your trip.
Quick Stop at the Hong Kong Observation Wheel
After arriving at Central Pier, I walked past the Hong Kong Observation Wheel.
I rode it during my previous Hong Kong trip back in January and enjoyed the experience.
If you’re visiting for the first time, I recommend riding it at sunset or after dark when the city lights begin to shine.
The nighttime views are much more impressive than during the day.
Visiting the Famous Kennedy Town Basketball Court
From Central, I took the MTR to Kennedy Town.
One of the most popular spots here is the Kennedy Town Basketball Court, which has become famous on Instagram and TikTok because of its unique backdrop.
The combination of colorful basketball courts, high-rise buildings, and waterfront views makes it one of the most photogenic locations in Hong Kong.
If you’re planning to take photos, try visiting during late afternoon when the lighting is softer.
Expect to wait a little if you’re looking for the perfect shot since the area is popular among tourists.
Coffee Break at % Arabica Kennedy Town
After taking photos, I headed to % Arabica Kennedy Town.
This branch is easily one of the busiest coffee shops in Hong Kong. Every time I pass by, it’s packed. The coffee is good, but I think what really attracts people is the location.
The large windows, harbor views, and minimalist design make it a great place to relax for a while before continuing your itinerary.
Sunset Cruise on Victoria Harbour
The highlight of my day was definitely the sunset cruise.
I’ve seen Victoria Harbour many times, but seeing it from the water during sunset felt completely different.
The cruise lasted approximately 45 minutes and included unlimited drinks and light snacks.
One thing I appreciated was how friendly the staff were.
They actively helped guests take photos and even used portable lights to improve everyone’s pictures once it started getting dark.
As the sun slowly disappeared behind the skyline, the city transformed from golden hour into a sea of lights.
It was one of those moments that reminded me why I keep coming back to Hong Kong.
If you’re celebrating a special occasion or simply want a memorable experience, I highly recommend adding a Victoria Harbour sunset cruise to your itinerary.
After the cruise, I grabbed another coffee from Luckin Coffee and found a good viewing spot along the harbor.
At 8 PM, the Symphony of Lights began.
The colorful lights dancing across Hong Kong’s iconic skyline created the perfect ending to the day.
Watching the show while sipping coffee and enjoying the cool evening breeze felt like the perfect way to end my second day in Hong Kong.
Is This Hong Kong Day 2 Itinerary Worth It?
Absolutely.
This itinerary is perfect if you want a slower-paced day that combines sightseeing, coffee stops, photography spots, and one unforgettable sunset experience.
For first-time visitors, it also provides a good balance between famous attractions and local neighborhoods without feeling rushed.
Sometimes the best travel days aren’t the busiest ones. Sometimes they’re the days when you simply enjoy the city at your own pace.
Final Thoughts
Hong Kong continues to surprise me every time I visit.
Even though this wasn’t my first trip, I still found new experiences to enjoy—from taking the Water Taxi to watching another beautiful sunset over Victoria Harbour.
If you’re planning your own Hong Kong adventure, don’t be afraid to leave room in your itinerary for slow mornings, spontaneous coffee breaks, and unexpected moments. Those often become the most memorable parts of the trip.
“Travel isn’t always about checking everything off your list. Sometimes it’s about slowing down and enjoying where you are.”
Hi, I’m Helena! 👋
I’m the creator of Mommy Helena, a travel blog where I share detailed itineraries, hotel reviews, food discoveries, and travel tips based on my personal experiences across Asia.
As a solo traveler from the Philippines, I love exploring destinations like Hong Kong, Taiwan, Vietnam, Thailand, Singapore, and beyond. My goal is to help fellow travelers plan smarter, save time, and make the most of every trip.
✈️ Follow my adventures and discover practical travel guides, budget tips, and honest recommendations from my journeys.
Affiliate Disclosure: Some links in this article may be affiliate links. This means I may earn a small commission if you book through them at no extra cost to you. I only recommend hotels, tours, and travel services that I personally use or believe may be helpful for fellow travelers. Thank you for supporting Mommy Helena and helping me continue creating free travel content.
Quick Summary Box
How Much Does a Taiwan Trip Cost?
One of the most common questions I receive is:
“How much money should I bring to Taiwan?”
To help fellow travelers plan their budget, I’m sharing my actual expenses from my recent 6 Days 5 Nights Taiwan trip covering Taichung and Taipei.
During this trip, I visited:
Alishan
Qingjing Farm
Qingjing Skywalk
Sun Moon Lake
Ximending
Taipei
This breakdown includes my hotels, transportation, food, tours, travel tax, eSIM, and travel insurance.
Important Disclaimer
✈️ Flight fare is NOT included in this budget breakdown.
Taiwan was part of my multi-country trip, so airfare was booked together with other destinations and would not accurately represent a standalone Taiwan trip cost.
Also keep in mind that:
Hotel costs may vary depending on your accommodation preference.
Food expenses will depend on your eating habits.
Activities can be customized based on your interests.
Shopping and souvenirs are excluded from the main travel budget since they are optional expenses.
If you’ve been following my Taiwan adventures, you’ll know I love exploring local cafes as much as tourist attractions.
This budget includes meals, coffee stops, milk tea, snacks, and convenience store purchases.
Day
Cost
Day 1
₱948
Day 2
₱921
Day 3
₱795
Day 4
₱1,361
Day 5
₱1,350
Day 6
₱1,032
Total Food Cost
💰 ₱6,407
Average Daily Food Budget
💰 ₱1,068 per day
Taiwan Budget Summary
Category
Cost
Pre-Travel
₱2,627
Hotels
₱16,724
Transportation
₱2,943
Activities
₱6,498
Food
₱6,407
TOTAL
₱35,199
Is Taiwan Expensive for Filipinos?
Based on my experience, Taiwan offers excellent value for money.
For approximately ₱35,199 excluding flights, I was able to:
✔️ Stay for 6 days and 5 nights
✔️ Visit Alishan
✔️ Visit Qingjing Farm
✔️ Explore Sun Moon Lake
✔️ Travel between Taichung and Taipei
✔️ Enjoy cafes, local food, and sightseeing
Compared to many other destinations in Asia, Taiwan remains one of the easiest and most budget-friendly countries to explore independently.
Final Thoughts
My total essential travel cost for this Taiwan trip was:
💰 ₱35,199 (excluding flights)
If you’re planning your own Taiwan adventure, I hope this breakdown gives you a realistic idea of how much to budget for hotels, transportation, food, and attractions.
Taiwan continues to be one of my favorite destinations because of its convenient transportation, beautiful scenery, delicious food, and beginner-friendly travel experience.
Hi, I’m Helena! 👋
I’m the creator of Mommy Helena, a travel blog where I share detailed itineraries, hotel reviews, food discoveries, and travel tips based on my personal experiences across Asia.
As a solo traveler from the Philippines, I love exploring destinations like Hong Kong, Taiwan, Vietnam, Thailand, Singapore, and beyond. My goal is to help fellow travelers plan smarter, save time, and make the most of every trip.
✈️ Follow my adventures and discover practical travel guides, budget tips, and honest recommendations from my journeys.
Pip: Hong Kong: a city where you can ride a Disney parade float through your feelings and still make it to the outlet mall before checkout. Welcome to Mommy Helena Travels.
Mara: This episode follows Mommy Helena through two very connected Hong Kong experiences — what to buy and where to find it, and how to make the most of Hong Kong Disneyland's 20th Anniversary before it closes out. Let's start with the shopping haul.
Hong Kong Souvenirs And Finds
Pip: The question this post answers is deceptively simple: what do you actually bring home from Hong Kong, and is it worth the suitcase space?
Mara: The post opens with a framing line that sets the tone: "Some people collect stamps. I collect memories… and a few shopping bags along the way." The main stops were Hong Kong Disneyland, Citygate Outlets, and Causeway Bay.
Pip: So the whole trip becomes the itinerary, and the shopping is just what happens naturally around it. That's a useful reframe for anyone who feels guilty about hauling bags home.
Mara: The Disney haul centers on LinaBell merchandise — headband, small bag, shoulder plush, and accessories. One practical tip stands out: check the sale section first, where some items were discounted by almost 50 to 70 percent.
Pip: That's a real tip. Walk past the full-price display, find the clearance rack, save half your budget for egg tarts.
Mara: Exactly — and the egg tart stop is in there too. The Bakehouse branch inside Citygate Outlets gets a mention as a pre-airport must. On the souvenir side, the magnet selection surprised her: mahjong tile magnets, light-up train sign magnets, egg waffle magnets, street sign designs. Affordable, packable, and genuinely creative.
Pip: The Citygate Outlets section is worth flagging separately. North Face, Adidas, Nike, Coach — discounts running 40 to nearly 70 percent year-round. And the hotel, Novotel Citygate, connects directly to the mall.
Mara: That proximity is the practical hook. Last-minute outlet run on the way to the airport becomes genuinely easy when your hotel room is steps from the entrance.
Pip: From outlet finds to anniversary magic — the next segment is all Disneyland.
Hong Kong Disneyland's 20th Anniversary
Pip: The 20th Anniversary celebration at Hong Kong Disneyland ended June 7, and this guide exists to answer one question: what was actually worth your time before the clock ran out?
Mara: The post puts it plainly: "Disney magic isn't just about the rides or shows — it's about the memories you take home with you long after the fireworks end." That's the lens for everything that follows.
Pip: And the guide earns that line. Five visits — twice in January, three more in May — and each one still felt distinct. That's either a testament to the programming or a very dedicated travel blogger.
Mara: The anniversary highlights include the Friendtastic! parade, described as the largest-ever parade at the park, an anniversary castle stage show with projections and live performance, and a nighttime spectacular. The Magic Passport stamp hunt, priced at 129 HKD, tracks stamps across every land and ends with a limited 20th Anniversary Gold Medallion at Main Street U.S.A.
Pip: A treasure hunt that doubles as a souvenir. That's genuinely clever park design.
Mara: On the practical side, the guide covers food timing — eat before noon to avoid the lunch rush — and makes a case for the Early Entry Pass for first-timers who want shorter lines and unobstructed castle photos. The app recommendation is consistent throughout: download it before arrival to track show times, parade schedules, and character meetups.
Pip: The castle show at night keeps coming back as the emotional centerpiece. Lights, projections, music — it's the moment the guide keeps returning to as the reason the trip holds up across multiple visits.
Pip: Outlet discounts and anniversary magic — Hong Kong keeps rewarding the traveler who pays attention to the details.
Mara: There's more Hong Kong ahead. Next time, we go deeper.
Hi, I’m Helena! 👋
I’m the creator of Mommy Helena, a travel blog where I share detailed itineraries, hotel reviews, food discoveries, and travel tips based on my personal experiences across Asia.
As a solo traveler from the Philippines, I love exploring destinations like Hong Kong, Taiwan, Vietnam, Thailand, Singapore, and beyond. My goal is to help fellow travelers plan smarter, save time, and make the most of every trip.
✈️ Follow my adventures and discover practical travel guides, budget tips, and honest recommendations from my journeys.
This post may contain affiliate links. I may earn a small commission at no extra cost to you if you make a booking through my links. Thank you for supporting my content!
During my Hong Kong trip in April 2026, I stayed at Hotel Hart in Tsim Sha Tsui. As a solo traveler, I always prioritize location when choosing accommodations, and this hotel ended up being a convenient base for exploring Hong Kong.
Hi, I’m Helena! 👋
I’m the creator of Mommy Helena, a travel blog where I share detailed itineraries, hotel reviews, food discoveries, and travel tips based on my personal experiences across Asia.
As a solo traveler from the Philippines, I love exploring destinations like Hong Kong, Taiwan, Vietnam, Thailand, Singapore, and beyond. My goal is to help fellow travelers plan smarter, save time, and make the most of every trip.
✈️ Follow my adventures and discover practical travel guides, budget tips, and honest recommendations from my journeys.
Last Updated: May 2026 Based on my actual Taiwan trip in December 2025 via Clark International Airport and Starlux Airlines
Affiliate Disclosure: This post may contain affiliate links. If you book through my links, I may earn a small commission at no extra cost to you. I only recommend products and services that I personally use during my travels.
Taiwan Arrival Guide for Filipinos
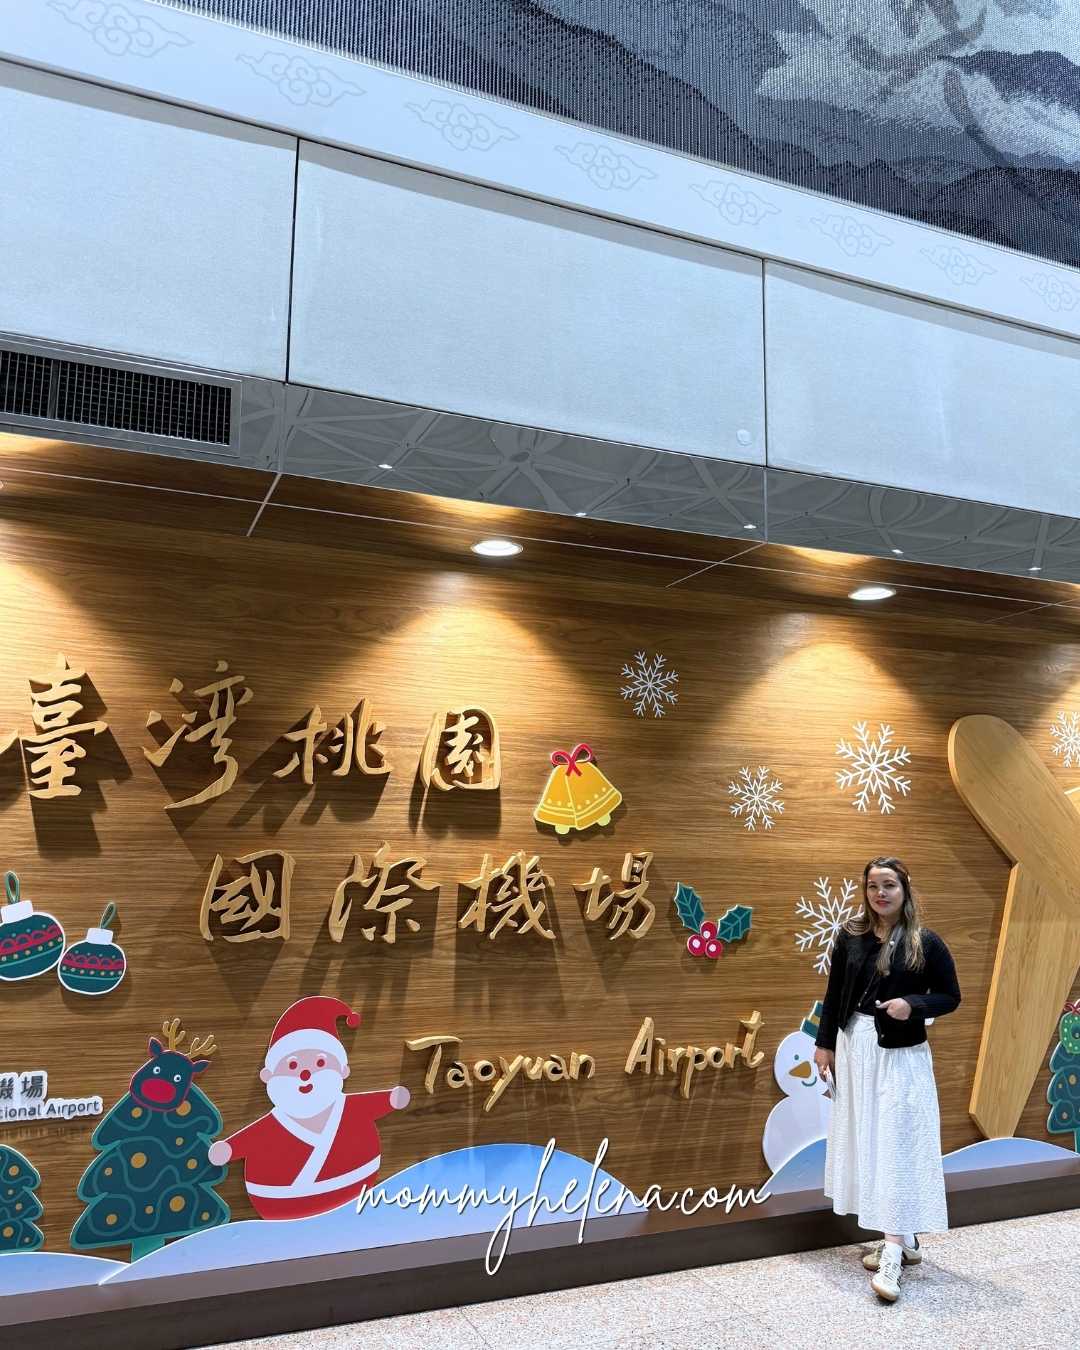
Taiwan is one of the countries I keep returning to. I’ve now visited Taiwan five times, and every trip has become easier because I already know what to prepare before leaving the Philippines and what to do immediately after landing.
This arrival guide is based on my actual experience during my last Taiwan trip in December 2025. For this visit, I flew from Clark International Airport to Taiwan via Starlux Airlines and followed the exact steps outlined in this guide—from completing my eTravel registration before departure to taking the Airport MRT into Taipei after landing.
If it’s your first time visiting Taiwan, this post will walk you through exactly what I personally do before departure and after arriving at Taoyuan Airport.
My Latest Taiwan Trip at a Glance
📅 Travel Date: December 2025
✈️ Airline: STARLUX Airlines
🛫 Departure Airport: Clark International Airport
🛬 Arrival Airport: Taoyuan International Airport
🏨 Base Area: Ximending, Taipei
🇹🇼 Taiwan Visit Number: 5
Quick Taiwan Travel Information
📍 Destination: Taiwan
✈️ Main Airport: Taoyuan International Airport (TPE)
🛂 Visa Required: No
📅 Visa-Free Stay: Up to 14 days
💳 Transportation Card: EasyCard
💵 Currency: New Taiwan Dollar (NTD)
📶 Recommended: eSIM
Good News: Taiwan is Visa-Free for Filipinos
One reason Taiwan remains one of the easiest destinations for Filipino travelers is its visa-free entry program.
Filipino passport holders can currently enter Taiwan visa-free for tourism for up to 14 days.
Even though a visa is not required, you should still prepare the following:
✔️ Passport with at least 6 months validity
✔️ Return or onward ticket
✔️ Hotel booking confirmation
✔️ Taiwan Arrival Card
✔️ eTravel Registration
✔️ Proof of sufficient funds (rarely requested but good to have)
I always save screenshots of these documents in a dedicated album on my phone before every trip.
🎥 Watch My Taiwan Arrival Guide in Under 60 Seconds
If you’re short on time, you can watch my Taiwan Arrival Guide video before continuing with the detailed step-by-step guide below.
Before Your Flight
Step 1: Complete Your eTravel Registration
Before leaving the Philippines, all departing passengers must complete their eTravel registration.
As a solo traveler, I always prioritize hotels near MRT stations because it makes getting around Taipei much easier.
I also love staying in Ximending because it’s convenient, lively, and packed with restaurants, shopping, and transportation options. Most of my Taiwan trips have been based in this area.
Here are some hotels I’ve personally stayed at:
🏨 Tomorrow Hotel A budget-friendly option located right in the heart of Ximending.
🏨 Rainbow Hotel One of the most convenient locations in Ximending and just a short walk from the MRT.
🏨 Airline Inn Ximen A modern hotel with comfortable rooms and excellent access to shopping and transportation.
🏨 Hotel Puri One of my favorite choices for solo travel thanks to its location near Ximen Station.
💡 Compare hotel prices before booking. I usually check multiple platforms because prices can vary depending on promotions and travel dates.
💡 Check Airport MRT operating hours if arriving late at night.
💡 Take screenshots of hotel bookings and return flights.
💡 Download Google Translate before your trip.
💡 If staying in Ximending, use the Airport MRT + MRT combination instead of taking a taxi.
Final Thoughts
After five visits to Taiwan, I’ve realized that arrival day becomes much easier when you prepare everything before your flight.
Completing your eTravel registration, Taiwan Arrival Card, transportation bookings, and eSIM setup ahead of time means less stress and more time enjoying your trip.
Taiwan remains one of the easiest destinations in Asia for Filipino travelers, and it’s a country I always look forward to visiting again.
“Every trip starts long before the plane takes off. The better you prepare, the more you can enjoy the journey.”
– Mommy Helena
✨ Ready to explore?
Book your hotels, tours, activities, flights, and travel essentials through my trusted travel partners:
🏨 Agoda
🎟️ Klook
🌍 GetYourGuide
✈️ Trip.com
Using my links helps support my travel content at no extra cost to you.
Travel smart, travel with style. See you on the next adventure! ✈️
Hi, I’m Helena! 👋
I’m the creator of Mommy Helena, a travel blog where I share detailed itineraries, hotel reviews, food discoveries, and travel tips based on my personal experiences across Asia.
As a solo traveler from the Philippines, I love exploring destinations like Hong Kong, Taiwan, Vietnam, Thailand, Singapore, and beyond. My goal is to help fellow travelers plan smarter, save time, and make the most of every trip.
✈️ Follow my adventures and discover practical travel guides, budget tips, and honest recommendations from my journeys.
“Some people collect stamps. I collect memories… and a few shopping bags along the way.”
My last trip to Hong Kong was in January 2026, and while the main purpose of the trip wasn’t shopping, I still came home with a suitcase full of goodies—from Disney merchandise and outlet finds to unique Hong Kong souvenirs.
If you’re planning a trip to Hong Kong, here’s a look at everything I bought, where I found them, and a few shopping tips based on my own experience.
🎥 Watch My Hong Kong Shopping Haul
Quick Trip Information
📍 Destination: Hong Kong
🏨 Hotel: Novotel Citygate Hong Kong
🧳 Travel Style: Solo Travel
🛍️ Main Shopping Stops:
Hong Kong Disneyland
Citygate Outlets
Causeway Bay
Adidas Hong Kong Exclusive Shirts
One of my favorite purchases from this trip was a pair of Adidas Hong Kong exclusive shirts. I always enjoy bringing home something unique from each destination, and these shirts were a perfect souvenir that I can actually wear.
I also found an Adidas jacket at Citygate Outlets at a discounted price. Definitely one of my best outlet finds during the trip.
Hong Kong Disneyland Merchandise
I can never visit Hong Kong Disneyland without bringing home a few Disney treasures.
This time, I added several LinaBell items to my collection. If you’ve visited Disney parks recently, you’ll know how popular this adorable pink fox has become.
My purchases included:
LinaBell headband
LinaBell small bag
LinaBell shoulder plush
Other LinaBell accessories
I also noticed they have a wallet version of their tote bag which looked really cute.
Don’t Skip the Sale Section
One of my biggest tips for Hong Kong Disneyland shoppers is to check the sale section before buying anything.
During my visit, some merchandise was discounted by almost 50% to 70% off.
I managed to grab:
Bucket hats
Keychains
Minnie Mouse bag charm
The selection was limited, but the savings were definitely worth checking out.
Important Disneyland Shopping Tip
Hong Kong Disneyland does not automatically provide plastic shopping bags with purchases.
If you don’t want to purchase their reusable tote bag (the cheapest one I saw was around HK$25), make sure to bring your own reusable shopping bag.
It’s a small thing, but it can save you money if you’re planning to buy lots of merchandise.
Hong Kong Souvenir Shopping
One thing I love about Hong Kong is the huge variety of souvenirs available.
Of course, I couldn’t leave without buying magnets.
What surprised me was how creative the designs have become.
Some of my favorites included:
Mahjong tile magnets
Light-up train sign magnets
Egg waffle magnets
Hong Kong-themed street sign magnets
Traditional Hong Kong landmark magnets
There were honestly so many designs to choose from that it was difficult to pick just a few.
If you’re looking for affordable souvenirs for friends and family, magnets remain one of the easiest items to pack and bring home.
I’d love to hear about your best shopping finds in the comments below.
And if you found this guide helpful, feel free to share it with your friends who are planning a trip to Hong Kong.
✨ Happy travels and happy shopping!
– Mommy Helena
Affiliate Disclosure
This post may contain affiliate links. If you make a purchase through these links, I may earn a small commission at no extra cost to you. Thank you for supporting Mommy Helena and helping me continue creating free travel content and guides.
Hi, I’m Helena! 👋
I’m the creator of Mommy Helena, a travel blog where I share detailed itineraries, hotel reviews, food discoveries, and travel tips based on my personal experiences across Asia.
As a solo traveler from the Philippines, I love exploring destinations like Hong Kong, Taiwan, Vietnam, Thailand, Singapore, and beyond. My goal is to help fellow travelers plan smarter, save time, and make the most of every trip.
✈️ Follow my adventures and discover practical travel guides, budget tips, and honest recommendations from my journeys.
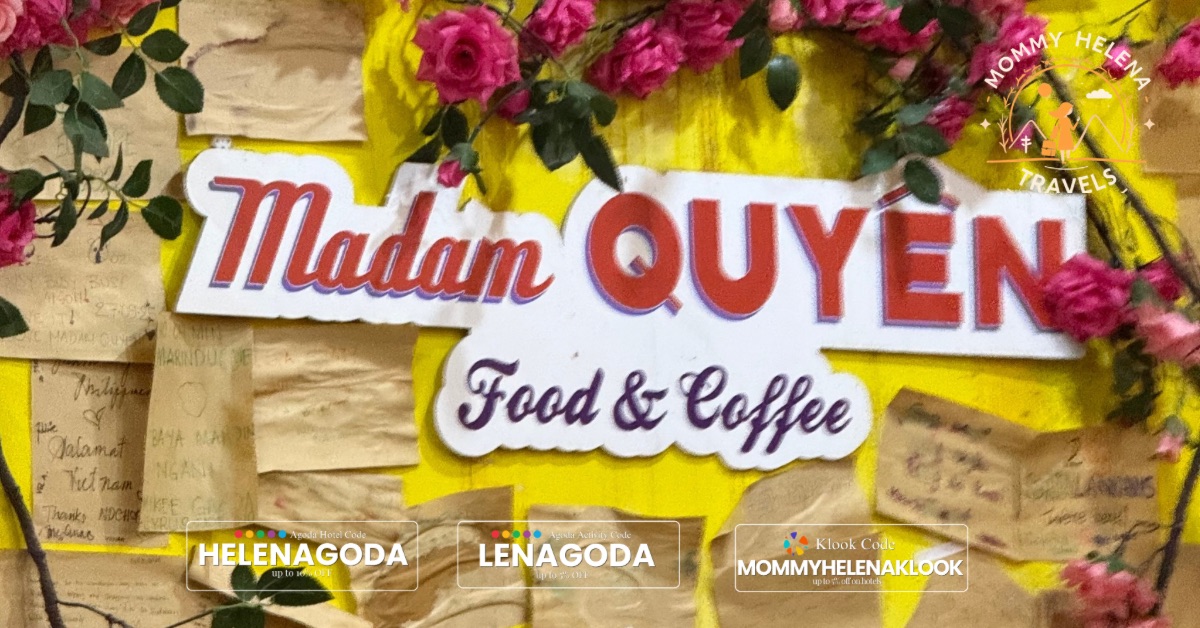
During my 3rd day in Ho Chi Minh City, after visiting Bitexco Tower, I finally dropped by the famous Café Apartment ✨
Since it was already late afternoon, I decided to have an early dinner at Madam Quyen — one of the cafés located inside the building.
What I loved most was how cozy and relaxing the place felt after walking around the city all day. And the best part? It was only a short walk from where I stayed at Palace Saigon Hotel.
QUICK INFO
📍 Floor 5, The Café Apartment ⏰ 9AM–10PM 💵 Cash only (Vietnamese Dong) 🛗 Elevator Fee: ~3,000–5,000 VND
ABOUT THE CAFÉ APARTMENT
The Café Apartment is one of the most popular spots in Ho Chi Minh City. It’s an old apartment building transformed into cafés, restaurants, boutiques, and creative spaces.
Every floor has something different to explore which makes it one of the most Instagram-worthy places in Saigon 🇻🇳
One interesting thing about visiting here is the elevator. Visitors usually pay a small fee to use it, although some cafés may reimburse the fee if you dine there.
WHAT I ORDERED
Rice Noodles with Grilled Pork
Spring Rolls
Egg Coffee (Must-Try!)
If it’s your first time in Vietnam, you definitely need to try egg coffee at least once ☕✨
Creamy, rich, and slightly sweet — one of the most unique coffees I’ve tried while traveling.
TRAVEL TIPS FOR VISITING THE CAFÉ APARTMENT
✔️ Bring cash in Vietnamese Dong ✔️ Wear comfortable shoes because there’s still a lot of walking ✔️ Explore the different floors of the building ✔️ Great stop after visiting Bitexco Tower or Nguyen Hue Walking Street
WHERE I STAYED
🏨 Palace Saigon Hotel
One thing I liked about staying here was the location. Many tourist spots including Bitexco Tower, Nguyen Hue Walking Street, and the Café Apartment were all within walking distance.
Some links and codes shared in this blog may be affiliate links, which means I may earn a small commission at no extra cost to you if you make a booking through them. Thank you for supporting my travel content.
“Sometimes the best travel memories are made in small cafés after long walks around the city.”
Have you visited the Café Apartment in Ho Chi Minh City? Or do you have a favorite café in Vietnam? Let me know in the comments
Hi, I’m Helena! 👋
I’m the creator of Mommy Helena, a travel blog where I share detailed itineraries, hotel reviews, food discoveries, and travel tips based on my personal experiences across Asia.
As a solo traveler from the Philippines, I love exploring destinations like Hong Kong, Taiwan, Vietnam, Thailand, Singapore, and beyond. My goal is to help fellow travelers plan smarter, save time, and make the most of every trip.
✈️ Follow my adventures and discover practical travel guides, budget tips, and honest recommendations from my journeys.
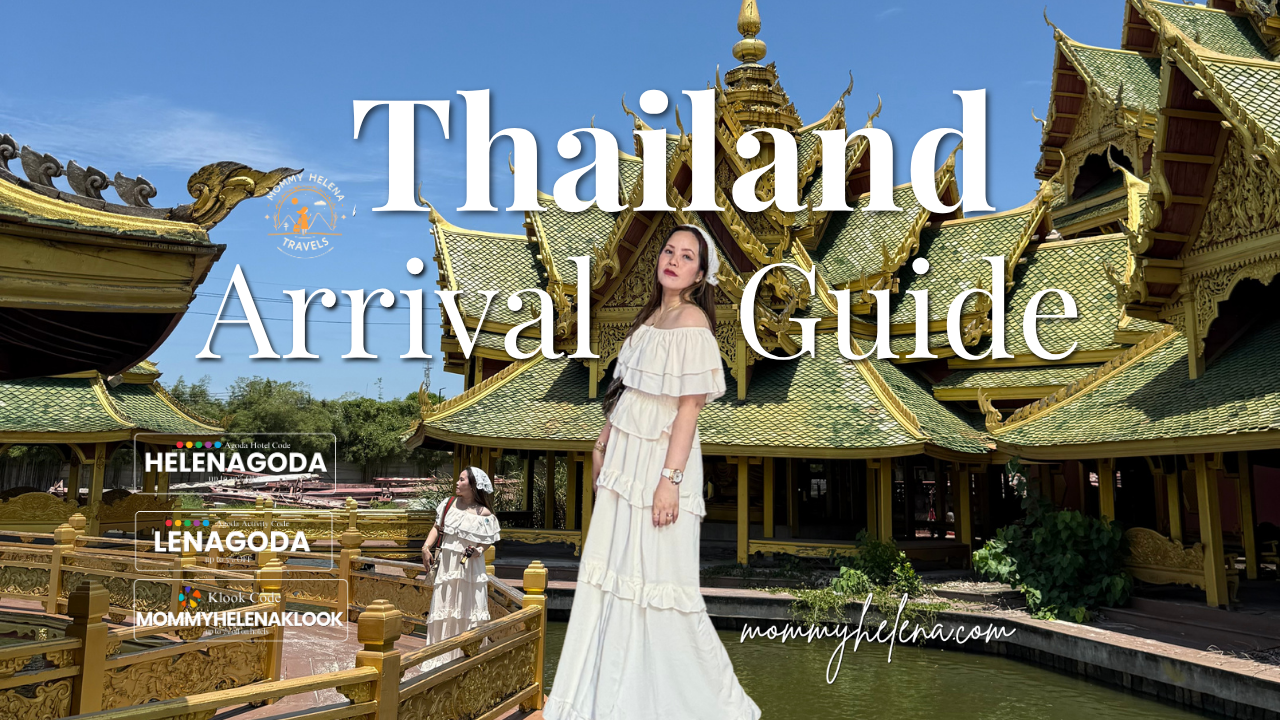
This Thailand Arrival Guide is based on my personal experience during my second trip to Thailand last June 2025. ✈️🇹🇭
I flew from Clark International Airport via Cebu Pacific and landed at Suvarnabhumi Airport.
During this trip, I stayed at Picnic Hotel Bangkok and Hotel De Bangkok.
Everything you need to know after landing in Bangkok — immigration, SIM cards, airport transport, money exchange, and essential travel tips for first-time visitors.
Disclosure: This blog may contain affiliate links. This means I may earn a small commission if you book through my links — at no extra cost to you. Thank you for supporting my travel content and helping me continue creating guides like this. 🧡
During my trip, I withdrew Thai Baht directly from the ATM at the airport using my GCash card.
There is a withdrawal fee, but it’s very convenient especially if you don’t want to exchange large amounts immediately.
If you prefer exchanging money, look for SuperRich Forex located at the basement level of the airport because they usually offer better exchange rates.
K Bank
Internet & eSIM Tips 📱
Before, I used to buy physical SIM cards whenever I traveled.
But because of the hassle of changing SIM cards, I now prefer using eSIMs.
There’s no need to remove your physical SIM card — just activate your eSIM a day before departure and make sure your phone is eSIM compatible.
This made arriving in Thailand much easier because I already had internet connection immediately after landing.
💡 Night Markets Usually Prefer Cash Most night markets in Bangkok usually accept cash only, so it’s helpful to always carry small amounts of Thai Baht.
💡 Bangkok Traffic Is Heavy
Use the BTS whenever possible because traffic can get very bad especially during rush hour.
💡 Activate Your eSIM Early
Activate your eSIM at least one day before departure to avoid setup issues at the airport.
💡 Prepare Grab App Before Arrival
Install and set up Grab before flying to Thailand for easier airport pickup.
This guide is based entirely on my own experience during my second trip to Thailand last June 2025.
Arriving prepared honestly makes the trip so much smoother — especially when it comes to transportation, internet connection, and commuting around Bangkok.
Thailand remains one of my favorite destinations because it’s very tourist-friendly, easy to navigate, and full of amazing food and experiences. 🇹🇭✨
Thailand Travel Essentials
✈️ Ready for Thailand?
“Thailand is one of my favorite destinations in Asia and arriving prepared makes the trip so much smoother…”
Hi, I’m Helena! 👋
I’m the creator of Mommy Helena, a travel blog where I share detailed itineraries, hotel reviews, food discoveries, and travel tips based on my personal experiences across Asia.
As a solo traveler from the Philippines, I love exploring destinations like Hong Kong, Taiwan, Vietnam, Thailand, Singapore, and beyond. My goal is to help fellow travelers plan smarter, save time, and make the most of every trip.
✈️ Follow my adventures and discover practical travel guides, budget tips, and honest recommendations from my journeys.